
今回の記事は、以下の記事をモチーフに作成した学習記録アプリのチュートリアルです。

こちらの3-3. 課題3をベースに進めてます。元記事では、データの格納にBaaS(Backend as a Service)であるSupabaseを利用したものとなっていますが、この記事では、データはローカルストレージに格納する方式としています。Supabaseを活用したものは、次回に紹介したいと思います。

目次
はじめに
本記事は、Reactの初学者向けのチュートリアルコンテンツです。上記参考サイトの機能をベースに記載しています。Reactの基本的な使い方から実際にアプリケーションをデプロイしてユーザーが使えるリリースまでを行えます。
React環境は、Vite+TypeScript
CSS+UIツールとしては、Chakra UI、アイコンとして、React Icons
ホスティングサービスは、GoogleのFirebaseを利用しています。
本記事で以下の対応が可能です。
- React+Vite環境の構築
- useStateによるState管理、Propsの扱い、useEffectの使用
- Formイベント、イベントハンドラーの扱い
- TypeScriptのコード記述
- ChakraUIの導入・利用
- Reactアイコンの利用
- ローカルストレージへのデータ格納と読込
- GitHubリポジトリの扱い
- Firebaseホスティングの利用、GitHubと連携した自動デプロイ 等


1. 環境構築
まずは、環境構築です。
JavaScript実行環境のnode.jsとパッケージマネージャのnpmをインストールします。
(既に環境がある方はスキップしてください)
macでのインストールはbrewを使う場合もありますが、私の環境では、brewがうまくパスが通らないので、無難にインストーラパッケージをインストールしました。Windowsの方も同じくインストーラからインストールです。

インストール完了したら、node.jsとnpmのバージョン確認をしましょう。
-vはバージョン確認のコマンドです。
node -v
v20.16.0

npm -v
10.8.1
次にViteを利用してReactプロジェクトを作成します。
npm create vite@latest でプロジェクト作成を実行します。
プロジェクト名は「learning-records」で
他の選択肢は下記の通りです。
npm create vite@latest
✔ Project name: … learning-records
✔ Select a framework: › React
✔ Select a variant: › TypeScript
これでReactの初期環境構築は完了です。
続けて出てくる内容に従って、環境起動を行います。
cd learning-records
npm i
npm run dev
npm i は、プロジェクト作成時に生成された、プロジェクトのライブラリの依存環境が記載されたpackage.jsonに明示されているすべてのパッケージをインストールします。
npm run devは、開発用のサーバの起動を行います。これにより、ブラウザで開発プロジェクトの実行結果を確認出来ます。通常開発サーバは、http://localhost:5173/
で起動されます。
localhost:5173にアクセスすると以下の画面が表示されます

次に、Chakra UIのインストールです。
Chakra UIのサイトの「Get Started」に「Installation」の記載がありますので、それに従ってターミナルでコマンドを投入してください。
サーバを起動したターミナルで「ctrl-c」を入力し一度サーバ停止するか、別のターミナルを開いてlearning-recordsディレクトリに移動してインストールします
npm i @chakra-ui/react @emotion/react @emotion/styled framer-motion次にReact Iconsをインストールします。
npm i react-icons一度開発サーバーを落とした場合は、npm run dev コマンドで、再度、開発サーバを起動します。以降インストールする際に開発サーバーを停止してインストールコマンドを実行した場合は、同様に操作します。(開発サーバー起動したままで別のターミナルウィドウからインストールコマンドを実行することも可能です)
次にVSCode等のエディタでコードを記載していきます。VSCode等のエディタでlearning-recordsディレクトリを開きます。なお、ローカルで開発される方は、拡張性の高さ、使い勝手の良さ、作業効率などで、VSCodeが圧倒的にお薦めです。

プロジェクトルートのsrcフォルダ内、App.tsxを開き、以下のようにコードを記載します。
以下は、App.tsxの初期内容です。これらは不要ですので、一旦全て削除します。
// /src/App.tsx
//↓全て削除します
import { useState } from 'react'
import reactLogo from './assets/react.svg'
import viteLogo from '/vite.svg'
import './App.css'

function App() {
  const [count, setCount] = useState(0)

  return (
    <>
      <div>
        <a href="https://vitejs.dev" target="_blank">
          <img src={viteLogo} className="logo" alt="Vite logo" />
        </a>
        <a href="https://react.dev" target="_blank">
          <img src={reactLogo} className="logo react" alt="React logo" />
        </a>
      </div>
      <h1>Vite + React</h1>
      <div className="card">
        <button onClick={() => setCount((count) => count + 1)}>
          count is {count}
        </button>
        <p>
          Edit <code>src/App.tsx</code> and save to test HMR
        </p>
      </div>
      <p className="read-the-docs">
        Click on the Vite and React logos to learn more
      </p>
    </>
  )
}

export default App
次に以下のように記載します。必要な「枠」だけ残す形です。
// /src/App.tsx
function App() {

  return (
    <>

    </>
  )
}

export default App
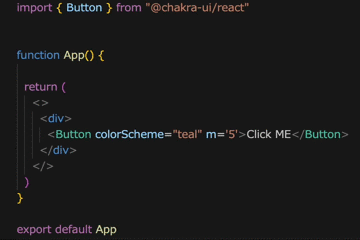
次にChakra UIのボタンを配置してみます。
// /src/App.tsx
import { Button } from "@chakra-ui/react"//インポート

function App() {

  return (
    <>
      <div>
      {/*カラースキームteal、margin 1(=4px)で設定*/}
        <Button colorScheme="teal" m='1'>Click me</Button>
      </div>
    </>
  )
}

export default App
上記はボタンの配色は「teal」、margin(m=" "で表現します)で設定しています。なお数値のみの場合は、1=4px(0.25rem)の換算となります。m="5px"等px指定も可能です。
なお、Reactコンポーネントを挿入する場合は(上記で言えば<Button>)、<Button>と入力すれば、VSCodeが自動で関連すると思われるコンポートのインポートを自動で補完してくれます。
下記は参考のGIF動画です。importされていなくても、コンポーネントタグの最後の一文字を削除しまた記載すればimportの候補先が表示され、自動でコードに挿入してくれます。
また、/src/main.tsxについては、Chakra UIのインポートと、<ChakraProvider>タグで囲む記載が必要です。元々記載のある、import ‘./index.css’は削除してください。
// /src/main.tsx
import { StrictMode } from 'react'
import { createRoot } from 'react-dom/client'
import App from './App.tsx'
import { ChakraProvider } from '@chakra-ui/react'//インポート
//import './index.css'//削除もしくはコメントアウト

createRoot(document.getElementById('root')!).render(
  <StrictMode>
    <ChakraProvider>//<ChakraProvider>タグで囲む
      <App />
    </ChakraProvider>//<ChakraProvider>タグで囲む
  </StrictMode>,
)localhost:5173をみるとグリーン(teal)のボタンが表示されます。いい感じです。

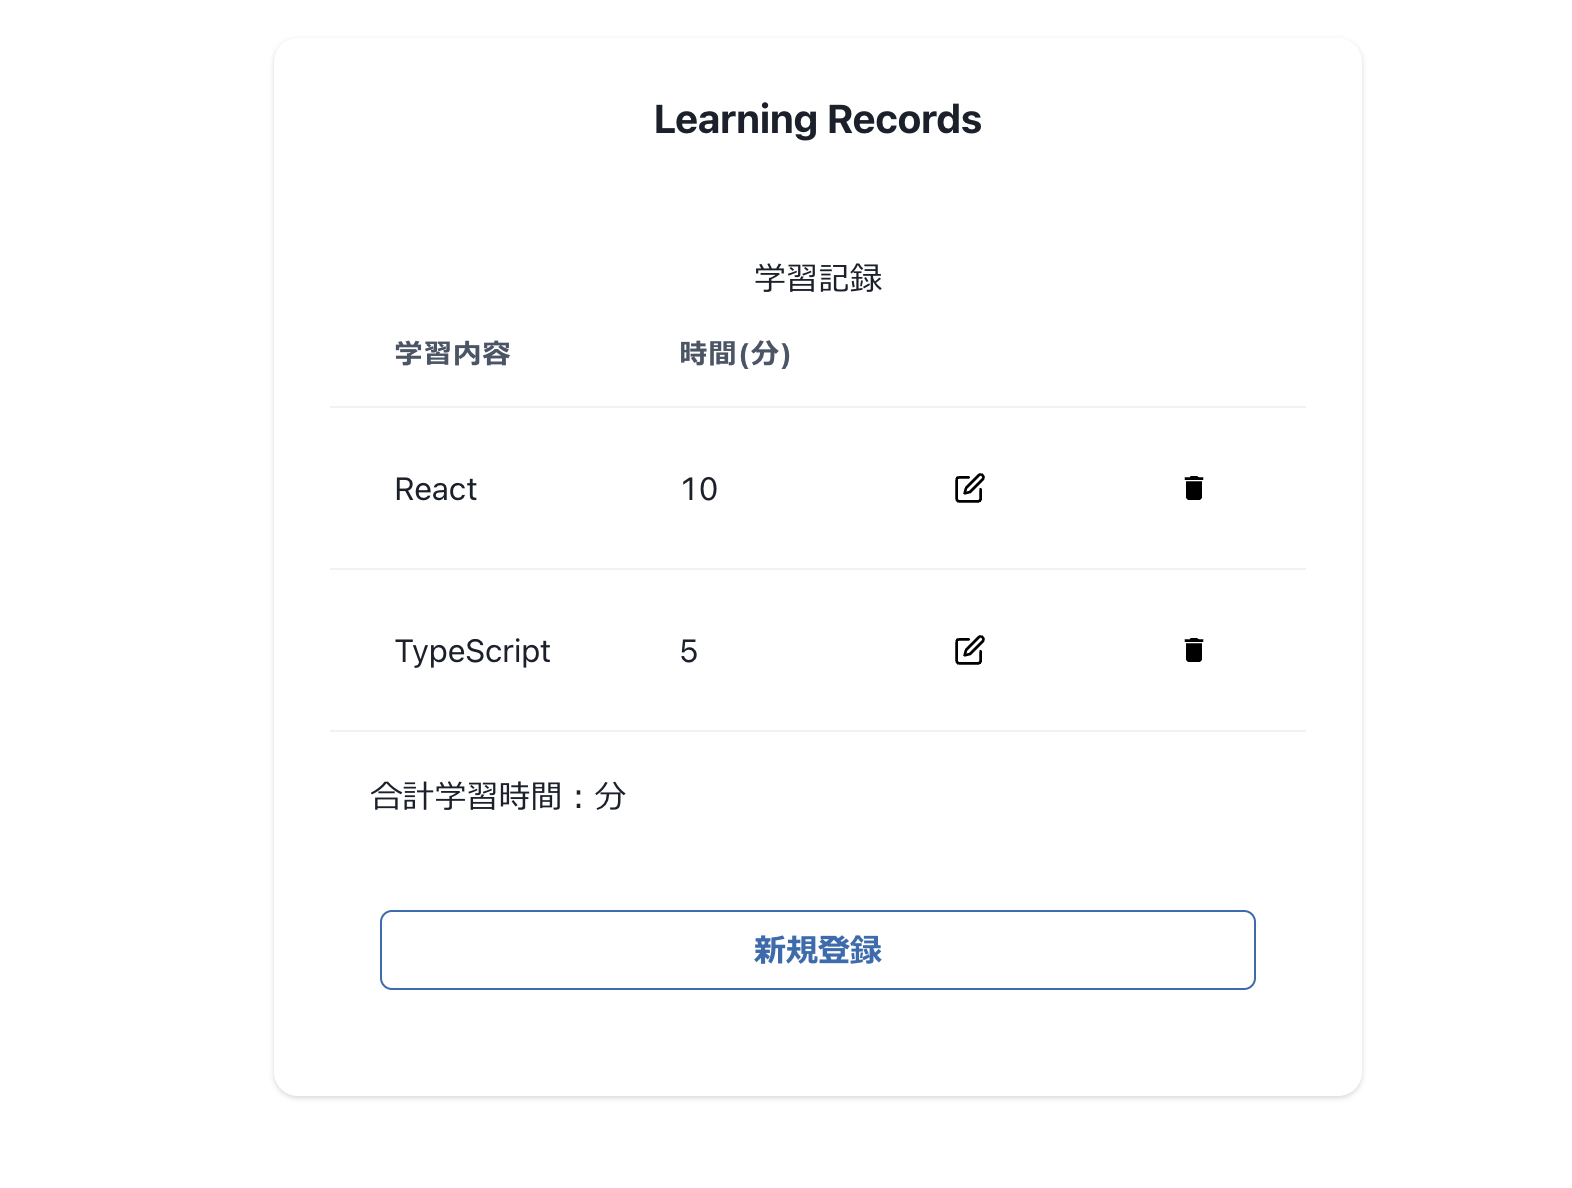
2. ベースデザインの作成
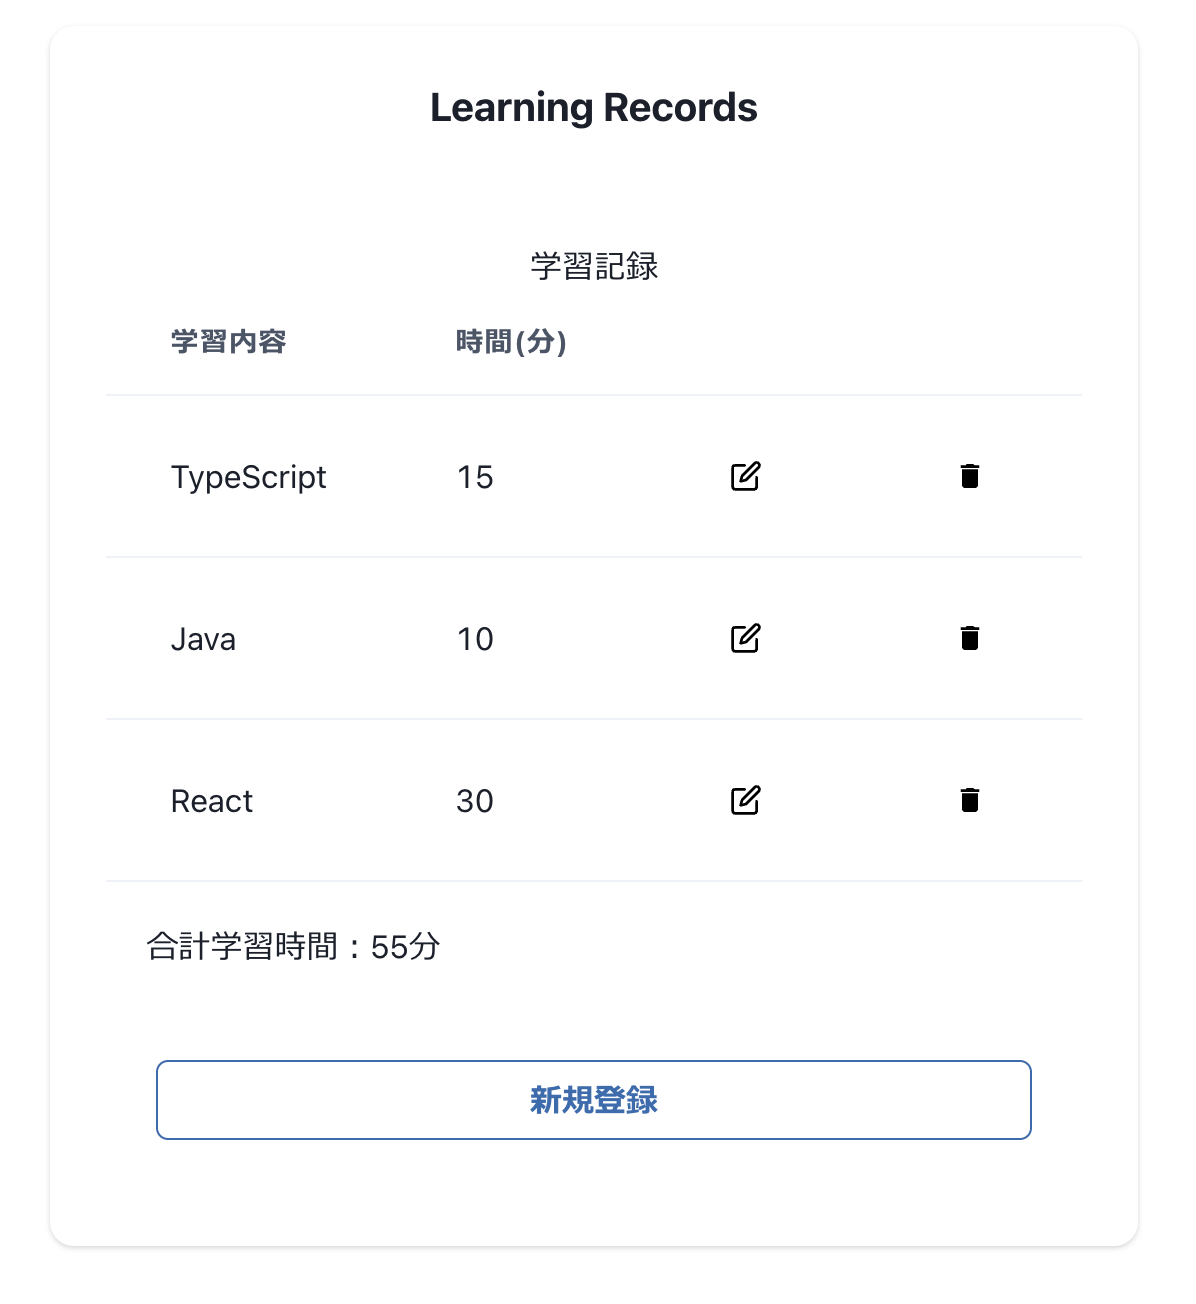
まずは学習記録アプリのベースデザインを作成します。
機能面はこのあと実装していきます
/src/App.tsxに以下のようにコードを記載してください。
// /src/App.tsx
import { Box, Button, Card, CardBody, CardHeader, Flex, Heading, Stack, Table, TableContainer, Tbody, Td, Th, Thead, Tr } from "@chakra-ui/react"
import { FiEdit } from "react-icons/fi"
import { MdDelete } from "react-icons/md"

function App() {
  const learnings = [//学習記録の初期設定
    { title: 'React', time: 10 },
    { title: 'TypeScript', time: 5 }
  ]

  return (
    <>
      <Flex alignItems='center' justify='center' p={5}>//Flexレイアウト
        <Card size={{ base: 'sm', md: 'lg' }/*モバイル用はsm、ブレイクポイント指定*/}>
          <CardHeader>
            <Heading size='md' textAlign='center'>Learning Records</Heading>
          </CardHeader>
          <CardBody>
            <Box textAlign='center'>
              学習記録
              <TableContainer>
                <Table variant='simple' size={{ base: 'sm', md: 'lg' }/*モバイル用はsm、ブレイクポイント指定*/}>
                  <Thead>
                    <Tr>
                      <Th>学習内容</Th>
                      <Th>時間(分)</Th>
                      <Th></Th>
                      <Th></Th>
                    </Tr>
                  </Thead>
                  <Tbody>
                    {learnings.map((learning, index) => (
                      <Tr key={index}>
                        <Td>{learning.title}</Td>
                        <Td>{learning.time}</Td>
                        <Td>
                          <Button variant='ghost'><FiEdit color='black' /></Button>
                        </Td>
                        <Td>
                          <Button variant='ghost'><MdDelete color='black' /></Button>
                        </Td>
                      </Tr>
                    ))}
                  </Tbody>
                </Table>
              </TableContainer>
            </Box>
            <Box p={5}>
              <div>合計学習時間:分</div>
            </Box>
            <Box p={25}>
              <Stack spacing={3}>
                <Button
                  colorScheme='blue'
                  variant='outline'
                >
                  新規登録
                </Button>
              </Stack>
            </Box>
          </CardBody>
        </Card>
      </Flex>
    </>
  )
}

export default App
ReactではHTMLの部分とjsの部分を1つのファイルに書くことができます(JSXと呼ばれます)
コード中、return以降はJSX形式の記述です。

この中で各タグは、全てChakra UIのコンポーネントを活用しています。利用するコンポーネント毎にimportが必要な為、Chakura UIのimport分は長くなっています。前述の通り、使用するコンポーネントの末尾を削除→戻す事で、VSCcodeあれば自動でimportを補完してくれます(うまく動かない場合もあります・・・)。
// /src/App.tsx
import { Box, Button, Card, CardBody, CardHeader, Flex, Heading, Stack, Table, TableContainer, Tbody, Td, Th, Thead, Tr } from "@chakra-ui/react"
なお、importした後、使わなくなったコンポーネントは、VSCodeを利用している場合、下部に黄色波線が表示されます(下図参照)。そうしたコンポーネントはimportから削除するようにしましょう。そうしないとTypeScriptの場合、デプロイ時にエラーとなってしまいます。

// /src/App.tsx
                  <Tbody>
                    {learnings.map((learning, index) => (
                      <Tr key={index}>
                        <Td>{learning.title}</Td>
                        <Td>{learning.time}</Td>
                        <Td>
                          <Button variant='ghost'><FiEdit color='black' /></Button>
                        </Td>
                        <Td>
                          <Button variant='ghost'><MdDelete color='black' /></Button>
                        </Td>
                      </Tr>
                    ))}
                  </Tbody>
Learningsの内容は、このようにHTMLのなかでJavaScriptのmapを回してを作ることで表示しています。今回はtableを利用したデザインとしています。
また、表示される学習内容については、「編集」機能と「削除」機能を設けたいと思います。そのボタンは、React Iconsを使用しています。FiEditが編集アイコン、MdDeleteが削除アイコンです。<Button variant=’ghost’>はボタンにアイコン等を利用する場合に活用します(ボタンとしてはゴースト状態にする)
// /src/App.tsx
<Td>
<Button variant='ghost'><FiEdit color='black' /></Button>
</Td>
<Td>
<Button variant='ghost'><MdDelete color='black' /></Button>
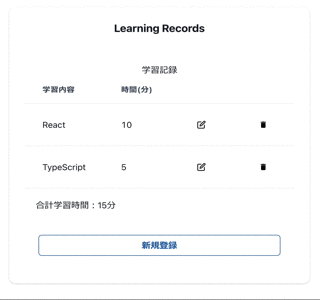
</Td>この時点で、以下のような画面イメージになります。
次に記録された合計時間を集計する機能を設けたいと思います。
  // /src/App.tsx
  const calculateTotalTime = () => {
    return learnings.reduce((total, learning) => total + learning.time, 0);
  };
ここでは、JavaScriptの関数reduceを利用して、learningsに格納された、timeの値の総和を出しています。

これを踏まえて下記コードとなります。
// /src/App.tsx
import { Box, Button, Card, CardBody, CardHeader, Flex, Heading, Stack, Table, TableContainer, Tbody, Td, Th, Thead, Tr } from "@chakra-ui/react"
import { FiEdit } from "react-icons/fi"
import { MdDelete } from "react-icons/md"

function App() {
  const learnings = [
    { title: 'React', time: 10 },
    { title: 'TypeScript', time: 5 }
  ]

  const calculateTotalTime = () => {//学習時間集計機能追加
    return learnings.reduce((total, learning) => total + learning.time, 0);
  };

  return (
    <>
      <Flex alignItems='center' justify='center' p={5}>
        <Card size={{ base: 'sm', md: 'lg'}}>
          <CardHeader>
            <Heading size='md' textAlign='center'>Learning Records</Heading>
          </CardHeader>
          <CardBody>
            <Box textAlign='center'>
              学習記録
              <TableContainer>
                <Table variant='simple' size={{ base: 'sm', md: 'lg'}}>
                  <Thead>
                    <Tr>
                      <Th>学習内容</Th>
                      <Th>時間(分)</Th>
                      <Th></Th>
                      <Th></Th>
                    </Tr>
                  </Thead>
                  <Tbody>
                    {learnings.map((learning, index) => (
                      <Tr key={index}>
                        <Td>{learning.title}</Td>
                        <Td>{learning.time}</Td>
                        <Td>
                          <Button variant='ghost'><FiEdit color='black' /></Button>
                        </Td>
                        <Td>
                          <Button variant='ghost'><MdDelete color='black' /></Button>
                        </Td>
                      </Tr>
                    ))}
                  </Tbody>
                </Table>
              </TableContainer>
            </Box>
            <Box p={5}>
              <div>合計学習時間:{calculateTotalTime()}分</div>//学習合計時間追加
            </Box>
            <Box p={25}>
              <Stack spacing={3}>
                <Button
                  colorScheme='blue'
                  variant='outline'
                >
                  新規登録
                </Button>
              </Stack>
            </Box>
          </CardBody>
        </Card>
      </Flex>
    </>
  )
}

export default App
3. 新規登録機能の追加
次に新規に学習内容を追加する機能を実装していきます。現時点は新規登録ボタンはクリックしても何も起きない状態になっていますが、機能するようにしていきます。
モチーフにした元記事では、モーダルを利用した実装となってますので、本記事でもモーダルを活用したものとしたいと思います。
Chakra UIではモーダルに関するコンポーネントも多く整備されていますので、こちらを活用していきます。
3.1 新規登録の入力画面作成
モーダルの実装に当たり、App.tsxとは別のコンポーネントを作成します。
srcフォルダの配下にcomponentsフォルダを作成し、NewEntry.tsx と言うファイルを作成します(componentsフォルダを選択し、右クリック→新しいファイル作成)。
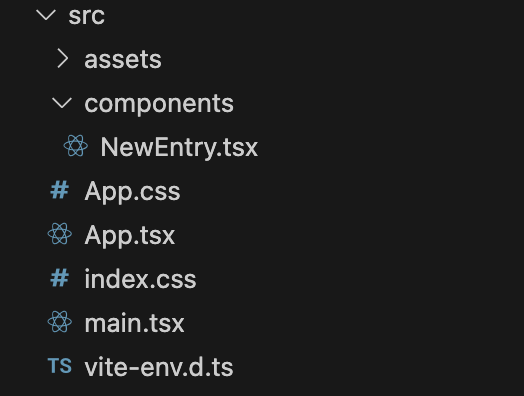
NewEntry.tsx に以下コードを記載します。
// /src/components/NewEntry.tsx
import { useRef, useState } from "react";
import { Button, FormControl, FormLabel, Input, Modal, ModalBody, ModalCloseButton, ModalContent, ModalFooter, ModalHeader, ModalOverlay, Stack, useDisclosure } from "@chakra-ui/react";


const NewEntry = () => {
    const [learning, setLearning] = useState({ title: "", time: 0 })
    const { isOpen, onOpen, onClose } = useDisclosure()//モーダルの開閉に必要となるhooks(機能)
    const initialRef = useRef(null)
    return (
        <>
            <Stack spacing={3}>
                <Button//モーダルを開くボタン
                    colorScheme='blue'
                    variant='outline'
                    onClick={onOpen}
                >
                    新規登録
                </Button>
            </Stack>
            <Modal//ここよりモーダルの内容
                initialFocusRef={initialRef}
                isOpen={isOpen}
                onClose={onClose}
            >
                <ModalOverlay />
                <ModalContent>
                    <ModalHeader>新規登録</ModalHeader>
                    <ModalCloseButton />
                    <ModalBody pb={6}>
                        <FormControl>
                            <FormLabel>学習内容</FormLabel>
                            <Input
                                ref={initialRef}//モダールオープン時にフォーカスする箇所を指定
                                name='newEntryTitle'
                                placeholder='学習内容'
                                value={learning.title}
                                onChange={(e) => {
                                    setLearning({ ...learning, title: e.target.value })
                                }}
                            />
                        </FormControl>

                        <FormControl mt={4}>
                            <FormLabel>学習時間</FormLabel>
                            <Input
                                type='number'
                                name='newEntryTime'
                                placeholder='学習時間'
                                value={learning.time}
                                onChange={(e) => {
                                    setLearning({ ...learning, time: Number(e.target.value) })
                                }}
                            />
                        </FormControl>
                        <div>入力されている学習内容:{learning.title}</div>
                        <div>入力されている学習時間:{learning.time}</div>
                    </ModalBody>
                    <ModalFooter>
                        <Button
                            colorScheme='blue'
                            variant='outline'
                            mr={3}>
                            登録
                        </Button>
                        <Button onClick={onClose}>Cancel</Button>
                    </ModalFooter>
                </ModalContent>
            </Modal>
        </>
    )
}
export default NewEntry
また、App.tsxを以下のように変更します。
// /src/App.tsx
import { Box, Button, Card, CardBody, CardHeader, Flex, Heading, Table, TableContainer, Tbody, Td, Th, Thead, Tr } from "@chakra-ui/react"
import { FiEdit } from "react-icons/fi"
import { MdDelete } from "react-icons/md"
import NewEntry from "./components/NewEntry";//NewEntryコンポーネントのimport追加

function App() {
  const learnings = [
    { title: 'React', time: 10 },
    { title: 'TypeScript', time: 5 }
  ]

  const calculateTotalTime = () => {
    return learnings.reduce((total, learning) => total + learning.time, 0);
  };

  return (
    <>
      <Flex alignItems='center' justify='center' p={5}>
        <Card size={{ base: 'sm', md: 'lg'}}>
          <CardHeader>
            <Heading size='md' textAlign='center'>Learning Records</Heading>
          </CardHeader>
          <CardBody>
            <Box textAlign='center'>
              学習記録
              <TableContainer>
                <Table variant='simple' size={{ base: 'sm', md: 'lg'}}>
                  <Thead>
                    <Tr>
                      <Th>学習内容</Th>
                      <Th>時間(分)</Th>
                      <Th></Th>
                      <Th></Th>
                    </Tr>
                  </Thead>
                  <Tbody>
                    {learnings.map((learning, index) => (
                      <Tr key={index}>
                        <Td>{learning.title}</Td>
                        <Td>{learning.time}</Td>
                        <Td>
                          <Button variant='ghost'><FiEdit color='black' /></Button>
                        </Td>
                        <Td>
                          <Button variant='ghost'><MdDelete color='black' /></Button>
                        </Td>
                      </Tr>
                    ))}
                  </Tbody>
                </Table>
              </TableContainer>
            </Box>
            <Box p={5}>
              <div>合計学習時間:{calculateTotalTime()}分</div>
            </Box>
            <Box p={25}>
              <NewEntry />
              {/* ↑NewEntryコンポーネントの読み込みと差し替え、
              この部分は、NewEntry冒頭のボタンが表示される。ボタンクリックでモーダル表示*/}
            </Box>
          </CardBody>
        </Card>
      </Flex>
    </>
  )
}

export default App
この時点で以下のような動きが実現できます。
画面の状態や表示を変更したい値(ここではlearningと定義してます)はuseStateを使います
// /src/components/NewEntry.tsx

const [learning, setLearning] = useState({ title: "", time: 0 })
learningは現在の値。
setLearningはlearningを変更するための関数で、title(学習内容)、time(学習時間)の値をセットで持たせてます。(keyとvalueの組み合わせの値で、オブジェクトと呼ばれます。)初期値は、title: “”、time: 0としてます。
useStateは、const [state, setState] と、値とそれを変更操作するためのset関数の組み合わせで、慣例的にset関数はset+最初大文字の値名とする事が多い(上記でいうと、state, setState)です。

フォームの箇所に、onChangeを追加し、入力イベントにより入力されたデータをsetLearningでlearningに格納するようにしています。
 // /src/components/NewEntry.tsx

 <Input
   ref={initialRef}//モダールオープン時にフォーカスする箇所を指定
   name='newEntryTitle'
   placeholder='学習内容'
   value={learning.title}
   onChange={(e) => {
       setLearning({ ...learning, title: e.target.value })//learning内のtitleの値を追加
   }}
  />

 <Input
   type='number'
   name='newEntryTime'
   placeholder='学習時間'
   value={learning.time}
   onChange={(e) => {
       setLearning({ ...learning, time: Number(e.target.value) })
       //learning内のtimeの値を追加。timeはnumber型の値であり、e.target.valueはstring型の為、Number()で型変換している
   }}
   />
そして、入力されたデータを下記で表示するようにしています。
 // /src/components/NewEntry.tsx

                        <div>入力されている学習内容:{learning.title}</div>
                        <div>入力されている学習時間:{learning.time}</div>
3.2 登録機能の追加
次に、NewEntry.tsxの「登録」ボタンをクリックすると、新しい学習記録として、入力されたデータがApp.tsxのテーブル表示に反映させるようにします。
現在、App.tsxで学習記録は、以下の固定値で定義されています。
  // /src/App.tsx

  const learnings = [
    { title: 'React', time: 10 },
    { title: 'TypeScript', time: 5 }
  ]
これを値を追加出来るようにstate化します。
  // /src/App.tsx

  const [learnings, setLearnings] = useState([//state化
    { title: 'React', time: 10 },
    { title: 'TypeScript', time: 5 }
  ])
また、新規登録時にlearningsに入力されたデータを追加する必要があるため、このlearnings, setLearningsを新規登録コンポーネントのNewEntry.tsxに渡す記述をします。
  // /src/App.tsx

<NewEntry learnings={learnings} setLearnings={setLearnings} />{/*/NewEntryに渡す*/}
App.tsxの全体のコードは以下です。
// /src/App.tsx
import { useState } from "react";
import { Box, Button, Card, CardBody, CardHeader, Flex, Heading, Table, TableContainer, Tbody, Td, Th, Thead, Tr } from "@chakra-ui/react"
import { FiEdit } from "react-icons/fi"
import { MdDelete } from "react-icons/md"
import NewEntry from "./components/NewEntry";

function App() {
  const [learnings, setLearnings] = useState([//state化
    { title: 'React', time: 10 },
    { title: 'TypeScript', time: 5 }
  ])

  const calculateTotalTime = () => {
    return learnings.reduce((total, learning) => total + learning.time, 0);
  };

  return (
    <>
      <Flex alignItems='center' justify='center' p={5}>
        <Card size={{ base: 'sm', md: 'lg' }}>
          <CardHeader>
            <Heading size='md' textAlign='center'>Learning Records</Heading>
          </CardHeader>
          <CardBody>
            <Box textAlign='center'>
              学習記録
              <TableContainer>
                <Table variant='simple' size={{ base: 'sm', md: 'lg' }}>
                  <Thead>
                    <Tr>
                      <Th>学習内容</Th>
                      <Th>時間(分)</Th>
                      <Th></Th>
                      <Th></Th>
                    </Tr>
                  </Thead>
                  <Tbody>
                    {learnings.map((learning, index) => (
                      <Tr key={index}>
                        <Td>{learning.title}</Td>
                        <Td>{learning.time}</Td>
                        <Td>
                          <Button variant='ghost'><FiEdit color='black' /></Button>
                        </Td>
                        <Td>
                          <Button variant='ghost'><MdDelete color='black' /></Button>
                        </Td>
                      </Tr>
                    ))}
                  </Tbody>
                </Table>
              </TableContainer>
            </Box>
            <Box p={5}>
              <div>合計学習時間:{calculateTotalTime()}分</div>
            </Box>
            <Box p={25}>
              <NewEntry learnings={learnings} setLearnings={setLearnings} />{/*/NewEntryに渡す*/}
            </Box>
          </CardBody>
        </Card>
      </Flex>
    </>
  )
}

export default App
次に、NewEntry.tsxです。
TypeScriptでは型定義が必要になりますので、App.tsxより受け取るデータの型を定義します。
// /src/components/NewEntry.tsx

type Props = {//App.texより受け取るデータの型定義、{}で定義されたオブジェクトの配列の為、末尾に[]
    learnings: { title: string, time: number }[];
    setLearnings: (learnings: { title: string, time: number }[]) => void;
}
同様にNewEntry関数定義の箇所に受け取るデータの型情報を記載します。
// /src/components/NewEntry.tsx

const NewEntry: React.FC<Props> = ({ learnings, setLearnings }) => {//App.tsxより受け取るデータとその型情報の記載
    const [learning, setLearning] = useState({ title: "", time: 0 })
    const { isOpen, onOpen, onClose } = useDisclosure()
    const initialRef = useRef(null)
続いて新規登録ボタンをクリックした際に、入力されたデータ(学習内容、学習時間)を学習内容、学習時間データの集合体である、learningsに追加する処理を、handleEntryとして定義します。
// /src/components/NewEntry.tsx

    //新しいレコード登録処理の追加
    const handleEntry = () => {
        setLearnings([...learnings, learning])//learningsにlearningの値を追加
        setLearning({ title: "", time: 0 })//追加後、learningの値を初期化
        onClose()
    }
setLearningsのほか、setLearningで新規登録モーダルに入力されたデータの初期化を行っています。onClose()はモーダルを閉じる処理です。
続いて、「新規登録」ボタンをクリックした際に、handleEntryが実行されるようにします。
// /src/components/NewEntry.tsx

                        <Button
                            colorScheme='blue'
                            variant='outline'
                            mr={3}
                            onClick={handleEntry}//ボタンクリックで入力データ追加(handleEntry実行)処理
                        >
NewEntry.tsxのコード全体は以下となります。
// /src/components/NewEntry.tsx
import { useRef, useState } from "react";
import { Button, FormControl, FormLabel, Input, Modal, ModalBody, ModalCloseButton, ModalContent, ModalFooter, ModalHeader, ModalOverlay, Stack, useDisclosure } from "@chakra-ui/react";

type Props = {//App.texより受け取るデータの型定義
    learnings: { title: string, time: number }[];
    setLearnings: (learnings: { title: string, time: number }[]) => void;
}

const NewEntry: React.FC<Props> = ({ learnings, setLearnings }) => {//App.tsxより受け取るデータとその型情報の記載
    const [learning, setLearning] = useState({ title: "", time: 0 })
    const { isOpen, onOpen, onClose } = useDisclosure()
    const initialRef = useRef(null)

    //新しいレコード登録処理の追加
    const handleEntry = () => {
        setLearnings([...learnings, learning])//learningsにlearningの値を追加
        setLearning({ title: "", time: 0 })//追加後、learningの値を初期化
        onClose()
    }

    return (
        <>
            <Stack spacing={3}>
                <Button
                    colorScheme='blue'
                    variant='outline'
                    onClick={onOpen}
                >
                    新規登録
                </Button>
            </Stack>
            <Modal
                initialFocusRef={initialRef}
                isOpen={isOpen}
                onClose={onClose}
            >
                <ModalOverlay />
                <ModalContent>
                    <ModalHeader>新規登録</ModalHeader>
                    <ModalCloseButton />
                    <ModalBody pb={6}>
                        <FormControl>
                            <FormLabel>学習内容</FormLabel>
                            <Input
                                ref={initialRef}
                                name='newEntryTitle'
                                placeholder='学習内容'
                                value={learning.title}
                                onChange={(e) => {
                                    setLearning({ ...learning, title: e.target.value })
                                }}
                            />
                        </FormControl>

                        <FormControl mt={4}>
                            <FormLabel>学習時間</FormLabel>
                            <Input
                                type='number'
                                name='newEntryTime'
                                placeholder='学習時間'
                                value={learning.time}
                                onChange={(e) => {
                                    setLearning({ ...learning, time: Number(e.target.value) })
                                }}
                            />
                        </FormControl>
                        <div>入力されている学習内容:{learning.title}</div>
                        <div>入力されている学習時間:{learning.time}</div>
                    </ModalBody>
                    <ModalFooter>
                        <Button
                            colorScheme='blue'
                            variant='outline'
                            mr={3}
                            onClick={handleEntry}//ボタンクリックで入力データ追加(handleEntry実行)処理
                        >
                            登録
                        </Button>
                        <Button onClick={onClose}>Cancel</Button>
                    </ModalFooter>
                </ModalContent>
            </Modal>
        </>
    )
}
export default NewEntry
この時点で下記のように、入力したデータが学習記録として追加されるようになりました。
3.3 エラーチェック機能
今時点の内容だと、新規登録時、空のデータでも登録が出来てしまいます。この点を改善するようにしていきます。
入力データが空の場合にエラー処理するようにします。
新たにエラーチェック用のstateを準備します。error, setErrorです。初期値は””
// /src/components/NewEntry.tsx

const NewEntry: React.FC<Props> = ({ learnings, setLearnings }) => {
    const [learning, setLearning] = useState({ title: "", time: 0 })
    const [error, setError] = useState("")//エラーチェック用のstate追加
次にエラーチェック処理をボタンクリック時の動作定義に記載します。if文による条件を記載します。learning.title及びlearning.timeの入力があれば、登録処理を実行、なければsetErrorにてエラーメッセージをセットと言う内容です。
// /src/components/NewEntry.tsx
                        <Button
                            colorScheme='blue'
                            variant='outline'
                            mr={3}
                            onClick={() => {
                                if (learning.title !== "" && learning.time > 0) {//エラーチェック条件記載
                                    handleEntry()
                                }
                                else setError("学習内容と時間を入力してください")
                            }}
                        >
                            登録
                        </Button>
そして入力エラー時には、赤文字でその内容を表示させます。
// /src/components/NewEntry.tsx
                        <div>入力されている学習内容:{learning.title}</div>
                        <div>入力されている学習時間:{learning.time}</div>
                        {error &&
                            <Box color="red">{error}</Box>} {/* errorがtrueの場合、エラー表示 */}
エラー表示後、フィールドに再度フォーカスすると、onFocus={() => setError(“”)}でエラー表示は消えるようにしてます。
// /src/components/NewEntry.tsx
                            <Input
                                type='number'
                                name='newEntryTime'
                                placeholder='学習時間'
                                value={learning.time}
                                onChange={(e) => {
                                    setLearning({ ...learning, time: Number(e.target.value) })
                                }}
                                onFocus={() => setError("")}//onFocusでエラー内容リセット
                            />
NewEntry.tsxのコード全体は以下となります。chakra-uiのimportにBoxを追加してますのでご注意ください。
// /src/components/NewEntry.tsx
import { useRef, useState } from "react";
import { Box, Button, FormControl, FormLabel, Input, Modal, ModalBody, ModalCloseButton, ModalContent, ModalFooter, ModalHeader, ModalOverlay, Stack, useDisclosure } from "@chakra-ui/react";

type Props = {
    learnings: { title: string, time: number }[];
    setLearnings: (learnings: { title: string, time: number }[]) => void;
}

const NewEntry: React.FC<Props> = ({ learnings, setLearnings }) => {
    const [learning, setLearning] = useState({ title: "", time: 0 })
    const [error, setError] = useState("")//エラーチェック用のstate追加
    const { isOpen, onOpen, onClose } = useDisclosure()
    const initialRef = useRef(null)

    const handleEntry = () => {
        setLearnings([...learnings, learning])
        setLearning({ title: "", time: 0 })
        onClose()
    }

    return (
        <>
            <Stack spacing={3}>
                <Button
                    colorScheme='blue'
                    variant='outline'
                    onClick={onOpen}
                >
                    新規登録
                </Button>
            </Stack>
            <Modal
                initialFocusRef={initialRef}
                isOpen={isOpen}
                onClose={onClose}
            >
                <ModalOverlay />
                <ModalContent>
                    <ModalHeader>新規登録</ModalHeader>
                    <ModalCloseButton />
                    <ModalBody pb={6}>
                        <FormControl>
                            <FormLabel>学習内容</FormLabel>
                            <Input
                                ref={initialRef}
                                name='newEntryTitle'
                                placeholder='学習内容'
                                value={learning.title}
                                onChange={(e) => {
                                    setLearning({ ...learning, title: e.target.value })
                                }}
                                onFocus={() => setError("")}
                            />
                        </FormControl>

                        <FormControl mt={4}>
                            <FormLabel>学習時間</FormLabel>
                            <Input
                                type='number'
                                name='newEntryTime'
                                placeholder='学習時間'
                                value={learning.time}
                                onChange={(e) => {
                                    setLearning({ ...learning, time: Number(e.target.value) })
                                }}
                                onFocus={() => setError("")}//onFocusでエラー内容リセット
                            />
                        </FormControl>
                        <div>入力されている学習内容:{learning.title}</div>
                        <div>入力されている学習時間:{learning.time}</div>
                        {error &&
                            <Box color="red">{error}</Box>} {/* errorがtrueの場合、エラー表示 */}
                    </ModalBody>
                    <ModalFooter>
                        <Button
                            colorScheme='blue'
                            variant='outline'
                            mr={3}
                            onClick={() => {
                                if (learning.title !== "" && learning.time > 0) {//エラーチェック条件記載
                                    handleEntry()
                                }
                                else setError("学習内容と時間を入力してください")
                            }}
                        >
                            登録
                        </Button>
                        <Button onClick={onClose}>Cancel</Button>
                    </ModalFooter>
                </ModalContent>
            </Modal>
        </>
    )
}
export default NewEntry
この時点で下記画面のような処理が実装されています。
3.4 重複エントリチェック機能
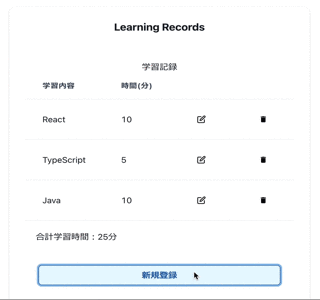
次に、現在は既にある学習内容と同一のものを登録した場合は、別の内容として二重登録されてしまいます。これを既にエントリがあるものか重複チェックを行い、既存の場合は、学習内容は新たに追加せず、重複した学習内容の時間に、入力された時間を加算させる処理を行います。
この実装にあたっては、登録処理を実行するhandleEntryにチェック機能を追加します。
コードは以下のようになります。
// /src/components/NewEntry.tsx

    const handleEntry = () => {
        const existingLearning = learnings.find((i) => i.title === learning.title);//findにて入力学習内容が既存のデータに存在するかチェック
        if (existingLearning) {
            // 既存があれば、既存エントリの時間を更新
            const updatedLearnings = learnings.map((i) =>
                i.title === learning.title ? { ...i, time: i.time + learning.time } : i
            );
            setLearnings(updatedLearnings);
        } else { // 既存になければ、新規エントリとして追加
            setLearnings([...learnings, learning]);
        }
        setLearning({ title: "", time: 0 });
        onClose();
    }
ここでは、JavaScriptのfind関数を用いて、入力された学習内容が、既存のlearningsに存在しているかチェックしています。既存エントリがある場合は、mapを回し、既存エントリの時間のみを加算させています。既存エントリが無い場合新規エントリとして学習内容と学習時間を共に追加しています。
なお、この後、エントリデータの編集と削除機能を追加しますので、そこで、既存エントリの編集は可能ですので、この新規登録画面では重複する場合は単にエラー表示としても良いかとは思いますが、ここでは重複データは学習時間を加算させる処理としました。
NewEntry.tsxのコード全体は以下です。
// /src/components/NewEntry.tsx
import { useRef, useState } from "react";
import { Box, Button, FormControl, FormLabel, Input, Modal, ModalBody, ModalCloseButton, ModalContent, ModalFooter, ModalHeader, ModalOverlay, Stack, useDisclosure } from "@chakra-ui/react";

type Props = {
    learnings: { title: string, time: number }[];
    setLearnings: (learnings: { title: string, time: number }[]) => void;
}

const NewEntry: React.FC<Props> = ({ learnings, setLearnings }) => {
    const [learning, setLearning] = useState({ title: "", time: 0 })
    const [error, setError] = useState("")
    const { isOpen, onOpen, onClose } = useDisclosure()
    const initialRef = useRef(null)

    const handleEntry = () => {
        const existingLearning = learnings.find((i) => i.title === learning.title);//findにて入力学習内容が既存のデータに存在するかチェック
        if (existingLearning) {
            // 既存があれば、既存エントリの時間を更新
            const updatedLearnings = learnings.map((i) =>
                i.title === learning.title ? { ...i, time: i.time + learning.time } : i
            );
            setLearnings(updatedLearnings);
        } else { // 既存になければ、新規エントリとして追加
            setLearnings([...learnings, learning]);
        }
        setLearning({ title: "", time: 0 });
        onClose();
    }

    return (
        <>
            <Stack spacing={3}>
                <Button
                    colorScheme='blue'
                    variant='outline'
                    onClick={onOpen}
                >
                    新規登録
                </Button>
            </Stack>
            <Modal
                initialFocusRef={initialRef}
                isOpen={isOpen}
                onClose={onClose}
            >
                <ModalOverlay />
                <ModalContent>
                    <ModalHeader>新規登録</ModalHeader>
                    <ModalCloseButton />
                    <ModalBody pb={6}>
                        <FormControl>
                            <FormLabel>学習内容</FormLabel>
                            <Input
                                ref={initialRef}
                                name='newEntryTitle'
                                placeholder='学習内容'
                                value={learning.title}
                                onChange={(e) => {
                                    setLearning({ ...learning, title: e.target.value })
                                }}
                                onFocus={() => setError("")}
                            />
                        </FormControl>

                        <FormControl mt={4}>
                            <FormLabel>学習時間</FormLabel>
                            <Input
                                type='number'
                                name='newEntryTime'
                                placeholder='学習時間'
                                value={learning.time}
                                onChange={(e) => {

                                    setLearning({ ...learning, time: Number(e.target.value) })
                                }}
                                onFocus={() => setError("")}
                            />
                        </FormControl>
                        <div>入力されている学習内容:{learning.title}</div>
                        <div>入力されている学習時間:{learning.time}</div>
                        {error &&
                            <Box color="red">{error}</Box>}
                    </ModalBody>
                    <ModalFooter>
                        <Button
                            colorScheme='blue'
                            variant='outline'
                            mr={3}
                            onClick={() => {
                                if (learning.title !== "" && learning.time > 0) {
                                    handleEntry()
                                }
                                else setError("学習内容と時間を入力してください")
                            }}
                        >
                            登録
                        </Button>
                        <Button onClick={onClose}>Cancel</Button>
                    </ModalFooter>
                </ModalContent>
            </Modal>
        </>
    )
}
export default NewEntry
画面は以下のようになります。
3.5 ローカルストレージへの保管・読込
次に学習データのローカルストレージへの保管機能を実装します。
現在の状態では、新たに登録された学習データは、リロードすると消えてしまいます。この防止の為に、ローカルストレージへの保管と、リロード時はローカルストレージから学習データを読み込む機能を追加します。
NewEntry.tsxにローカルストレージ保管処理を持たせてもいいですが、編集時や削除時も利用しますので、トップコンポーネントのApp.tsxにて機能を追加します。
ローカルストレージはブラウザ上に情報を保存する仕組みのことをいいます。簡単にいうとデータを入れておく箱のようなものです。5MBまでのデータ格納が可能です。
ローカルストレージ保管には、Storage: setItem() メソッドを利用します。
App.tsxにローカルストレージ保管の為の関数、savedLearningを定義します。
// /src/App.tsx

  //ローカルストレージに学習データを格納
  const savedLearning = (learnings: { title: string, time: number }[]) => {//型定義も
    localStorage.setItem("learnings", JSON.stringify(learnings));
  };
この関数をNewEntryに渡してあげます。
// /src/App.tsx

<NewEntry learnings={learnings} setLearnings={setLearnings} savedLearning={savedLearning} />{/*/NewEntryに渡す、savedLearning追加*/}
NewEntry.tsxは以下を追加します。まずは型定義と受取データ(Props)の追加です。
// /src/components/NewEntry.tsx

type Props = {
    learnings: { title: string, time: number }[];
    setLearnings: (learnings: { title: string, time: number }[]) => void;
    savedLearning: (learning: { title: string, time: number }[]) => void;//savedLearningの型定義追加
}

const NewEntry: React.FC<Props> = ({ learnings, setLearnings, savedLearning }) => {//savedLearning追加
次にhandleEntryにローカルストレージ格納機能のsavedLearningでの処理を追加します。
// /src/components/NewEntry.tsx

const handleEntry = () => {
        const existingLearning = learnings.find((i) => i.title === learning.title);
        if (existingLearning) {
            const updatedLearnings = learnings.map((i) =>
                i.title === learning.title ? { ...i, time: i.time + learning.time } : i
            );
            setLearnings(updatedLearnings);
            savedLearning(updatedLearnings);//ローカルストレージへの格納
        } else {
            const newLearnings = [...learnings, learning];//savedLearningは配列が引数となる為、引数を定数化
            setLearnings(newLearnings);
            savedLearning(newLearnings); // //ローカルストレージへの格納、配列を渡す
        }
        setLearning({ title: "", time: 0 });
        onClose();
    }
続いて、ページを再読み込みや、画面を閉じ後に再度アクセスした場合の処理です。
ローカルストレージにデータが保存されていない場合は、再読み込み、再アクセスにより入力されたデータは初期化/無くなってしまいますが、ローカルストレージの保存している場合はデータの読み込みにより、データの復活が実現出来ます。
この処理は、Reactの機能(hook)である、useEffectを利用します。

これは、App.tsxに実装します。
// /src/App.tsx

  //ローカルストレージに保存された学習データの自動読込、追加
  useEffect(() => {
    const storedLearning = localStorage.getItem("learnings");
    if (storedLearning) {
      setLearnings(JSON.parse(storedLearning));
    }
  }, []);
最後にある,[])の配列の箇所は、useEffectの処理を行う、トリガーを記載します。この例だと、[]と空の配列としてますので、ページ読み込み時のみ実行すると言う形です。
内容は、ローカルストレージに保存されたデータをJSONに形式として抽出し、setLearningsに渡しています。これをページ読み込み時に実行しています。
ここまでで、App.tsxのコード全体は下記です。
// /src/App.tsx
import { useEffect, useState } from "react";
import { Box, Button, Card, CardBody, CardHeader, Flex, Heading, Table, TableContainer, Tbody, Td, Th, Thead, Tr } from "@chakra-ui/react"
import { FiEdit } from "react-icons/fi"
import { MdDelete } from "react-icons/md"
import NewEntry from "./components/NewEntry";

function App() {
  const [learnings, setLearnings] = useState([
    { title: 'React', time: 10 },
    { title: 'TypeScript', time: 5 }
  ])

  //ローカルストレージに学習データを格納
  const savedLearning = (learnings: { title: string, time: number }[]) => {//型定義も
    localStorage.setItem("learnings", JSON.stringify(learnings));
  };

  //ローカルストレージに保存された学習データの自動読込、追加
  useEffect(() => {
    const storedLearning = localStorage.getItem("learnings");
    if (storedLearning) {
      setLearnings(JSON.parse(storedLearning));
    }
  }, []);

  const calculateTotalTime = () => {
    return learnings.reduce((total, learning) => total + learning.time, 0);
  };

  return (
    <>
      <Flex alignItems='center' justify='center' p={5}>
        <Card size={{ base: 'sm', md: 'lg' }}>
          <CardHeader>
            <Heading size='md' textAlign='center'>Learning Records</Heading>
          </CardHeader>
          <CardBody>
            <Box textAlign='center'>
              学習記録
              <TableContainer>
                <Table variant='simple' size={{ base: 'sm', md: 'lg' }}>
                  <Thead>
                    <Tr>
                      <Th>学習内容</Th>
                      <Th>時間(分)</Th>
                      <Th></Th>
                      <Th></Th>
                    </Tr>
                  </Thead>
                  <Tbody>
                    {learnings.map((learning, index) => (
                      <Tr key={index}>
                        <Td>{learning.title}</Td>
                        <Td>{learning.time}</Td>
                        <Td>
                          <Button variant='ghost'><FiEdit color='black' /></Button>
                        </Td>
                        <Td>
                          <Button variant='ghost'><MdDelete color='black' /></Button>
                        </Td>
                      </Tr>
                    ))}
                  </Tbody>
                </Table>
              </TableContainer>
            </Box>
            <Box p={5}>
              <div>合計学習時間:{calculateTotalTime()}分</div>
            </Box>
            <Box p={25}>
              <NewEntry learnings={learnings} setLearnings={setLearnings}
              savedLearning={savedLearning} />{/*/NewEntryに渡す、savedLearning追加*/}
            </Box>
          </CardBody>
        </Card>
      </Flex>
    </>
  )
}

export default App
また、NewEntry.tsxのコード全体は下記です
// /src/components/NewEntry.tsx
import { useRef, useState } from "react";
import { Box, Button, FormControl, FormLabel, Input, Modal, ModalBody, ModalCloseButton, ModalContent, ModalFooter, ModalHeader, ModalOverlay, Stack, useDisclosure } from "@chakra-ui/react";

type Props = {
    learnings: { title: string, time: number }[];
    setLearnings: (learnings: { title: string, time: number }[]) => void;
    savedLearning: (learning: { title: string, time: number }[]) => void;//savedLearningの型定義追加
}

const NewEntry: React.FC<Props> = ({ learnings, setLearnings, savedLearning }) => {//savedLearning追加
    const [learning, setLearning] = useState({ title: "", time: 0 })
    const [error, setError] = useState("")
    const { isOpen, onOpen, onClose } = useDisclosure()
    const initialRef = useRef(null)

    const handleEntry = () => {
        const existingLearning = learnings.find((i) => i.title === learning.title);
        if (existingLearning) {
            const updatedLearnings = learnings.map((i) =>
                i.title === learning.title ? { ...i, time: i.time + learning.time } : i
            );
            setLearnings(updatedLearnings);
            savedLearning(updatedLearnings);//ローカルストレージへの格納
        } else {
            const newLearnings = [...learnings, learning];//savedLearningは配列が引数となる為、引数を定数化
            setLearnings(newLearnings);
            savedLearning(newLearnings); // //ローカルストレージへの格納、配列を渡す
        }
        setLearning({ title: "", time: 0 });
        onClose();
    }

    return (
        <>
            <Stack spacing={3}>
                <Button
                    colorScheme='blue'
                    variant='outline'
                    onClick={onOpen}
                >
                    新規登録
                </Button>
            </Stack>
            <Modal
                initialFocusRef={initialRef}
                isOpen={isOpen}
                onClose={onClose}
            >
                <ModalOverlay />
                <ModalContent>
                    <ModalHeader>新規登録</ModalHeader>
                    <ModalCloseButton />
                    <ModalBody pb={6}>
                        <FormControl>
                            <FormLabel>学習内容</FormLabel>
                            <Input
                                ref={initialRef}
                                name='newEntryTitle'
                                placeholder='学習内容'
                                value={learning.title}
                                onChange={(e) => {
                                    setLearning({ ...learning, title: e.target.value })
                                }}
                                onFocus={() => setError("")}
                            />
                        </FormControl>

                        <FormControl mt={4}>
                            <FormLabel>学習時間</FormLabel>
                            <Input
                                type='number'
                                name='newEntryTime'
                                placeholder='学習時間'
                                value={learning.time}
                                onChange={(e) => {

                                    setLearning({ ...learning, time: Number(e.target.value) })
                                }}
                                onFocus={() => setError("")}
                            />
                        </FormControl>
                        <div>入力されている学習内容:{learning.title}</div>
                        <div>入力されている学習時間:{learning.time}</div>
                        {error &&
                            <Box color="red">{error}</Box>}
                    </ModalBody>
                    <ModalFooter>
                        <Button
                            colorScheme='blue'
                            variant='outline'
                            mr={3}
                            onClick={() => {
                                if (learning.title !== "" && learning.time > 0) {
                                    handleEntry()
                                }
                                else setError("学習内容と時間を入力してください")
                            }}
                        >
                            登録
                        </Button>
                        <Button onClick={onClose}>Cancel</Button>
                    </ModalFooter>
                </ModalContent>
            </Modal>
        </>
    )
}
export default NewEntry
ブラウザの検証ツール、アプリケーション、ローカルストレージの箇所(ブラウザによって表示箇所は異なるかも知れません)に、learningsと言うキー名称でデータが保存されているのが分かります。

これで、学習データのローカルストレージへの保管・読込が実現できました。
4. 編集機能の追加
続いて、既存エントリーの編集機能を追加します。
現状は、App.tsx上に編集用アイコンのボタンが表示されているだけですが、これをクリックすると、編集用のモーダルが表示されるようにします。ここでもChakra UIのModalコンポーネントを使っていきます。
4.1 編集画面の作成
編集用コンポーネントを新たに作成します。componentsフォルダ配下に、Edit.tsxを作成してください。
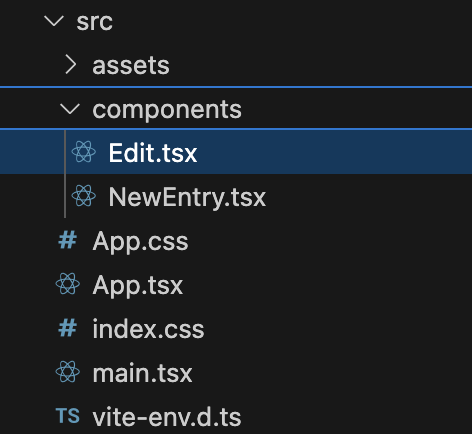
Edit.tsxに以下のコードを記載します。
// /src/components/Edit.tsx
import React, { useRef, useState } from 'react';
import { Button, FormControl, FormLabel, Input, Modal, ModalBody, ModalCloseButton, ModalContent, ModalFooter, ModalHeader, ModalOverlay, useDisclosure } from '@chakra-ui/react';
import { FiEdit } from "react-icons/fi"//編集用アイコンインポート

type Props = {
    index: number
    learning: { title: string, time: number }
    learnings: { title: string, time: number }[]
    setLearnings: (learnings: { title: string, time: number }[]) => void
}

const Edit: React.FC<Props> = ({ learning, index, learnings, setLearnings }) => {
    const { isOpen, onOpen, onClose } = useDisclosure()//モーダルの開閉に必要となるhooks(機能)
    const initialRef = useRef(null)
    const [localLearning, setLocalLearning] = useState(learning)//渡されたlearningを格納する為にローカルステートを定義

    const handleChangeTitle = (e: React.ChangeEvent<HTMLInputElement>) => {//学習内容の変更を反映
        setLocalLearning({
            ...localLearning,
            title: e.target.value
        })
    }

    const handleChangeTime = (e: React.ChangeEvent<HTMLInputElement>) => {//学習時間の変更を反映
        setLocalLearning({
            ...localLearning,
            time: Number(e.target.value)
        })
    }

    return (
        <>
            <Button variant='ghost' onClick={() => {//モーダルを開くボタン
                setLocalLearning(learning)//モーダルオープン時にlearning内容を再セット
                onOpen()
            }}><FiEdit color='black' /></Button>

            <Modal //ここよりモーダルの内容
                initialFocusRef={initialRef}
                isOpen={isOpen}
                onClose={onClose}
            >
                <ModalOverlay />
                <ModalContent>
                    <ModalHeader>記録編集</ModalHeader>
                    <ModalCloseButton />
                    <ModalBody pb={6}>
                        <FormControl>
                            <FormLabel>学習内容</FormLabel>
                            <Input
                                ref={initialRef}
                                placeholder='学習内容'
                                name='title'
                                value={localLearning.title}
                                onChange={handleChangeTitle}
                            />
                        </FormControl>

                        <FormControl mt={4}>
                            <FormLabel>学習時間</FormLabel>
                            <Input
                                type='number'
                                placeholder='学習時間'
                                name='time'
                                value={localLearning.time}
                                onChange={handleChangeTime}
                            />
                        </FormControl>
                        <div>入力されている学習内容:{localLearning.title}</div>
                        <div>入力されている学習時間:{localLearning.time}</div>
                    </ModalBody>

                    <ModalFooter>
                        <Button
                            colorScheme='blue'
                            variant='outline'
                            mr={3}
                        >
                            データを更新
                        </Button>
                        <Button onClick={onClose}>Cancel</Button>
                    </ModalFooter>
                </ModalContent>
            </Modal>
        </>
    )
}

export default Edit;
App.tsxを以下のように変更します。
// /src/App.tsx
import { useEffect, useState } from "react";
import { Box, Button, Card, CardBody, CardHeader, Flex, Heading, Table, TableContainer, Tbody, Td, Th, Thead, Tr } from "@chakra-ui/react"
//編集用アイコン、FiEditのインポート削除
import { MdDelete } from "react-icons/md"
import NewEntry from "./components/NewEntry";
import Edit from "./components/Edit";//Editコンポーネントをインポート


function App() {
  const [learnings, setLearnings] = useState([
    { title: 'React', time: 10 },
    { title: 'TypeScript', time: 5 }
  ])

  const savedLearning = (learnings: { title: string, time: number }[]) => {
    localStorage.setItem("learnings", JSON.stringify(learnings));
  };

  useEffect(() => {
    const storedLearning = localStorage.getItem("learnings");
    if (storedLearning) {
      setLearnings(JSON.parse(storedLearning));
    }
  }, []);

  const calculateTotalTime = () => {
    return learnings.reduce((total, learning) => total + learning.time, 0);
  };

  return (
    <>
      <Flex alignItems='center' justify='center' p={5}>
        <Card size={{ base: 'sm', md: 'lg' }}>
          <CardHeader>
            <Heading size='md' textAlign='center'>Learning Records</Heading>
          </CardHeader>
          <CardBody>
            <Box textAlign='center'>
              学習記録
              <TableContainer>
                <Table variant='simple' size={{ base: 'sm', md: 'lg' }}>
                  <Thead>
                    <Tr>
                      <Th>学習内容</Th>
                      <Th>時間(分)</Th>
                      <Th></Th>
                      <Th></Th>
                    </Tr>
                  </Thead>
                  <Tbody>
                    {learnings.map((learning, index) => (
                      <Tr key={index}>
                        <Td>{learning.title}</Td>
                        <Td>{learning.time}</Td>
                        <Td>
                          <Edit learning={learning} index={index} learnings={learnings} setLearnings={setLearnings} />{/*/Editに渡す*/}
                        </Td>
                        <Td>
                          <Button variant='ghost'><MdDelete color='black' /></Button>
                        </Td>
                      </Tr>
                    ))}
                  </Tbody>
                </Table>
              </TableContainer>
            </Box>
            <Box p={5}>
              <div>合計学習時間:{calculateTotalTime()}分</div>
            </Box>
            <Box p={25}>
              <NewEntry learnings={learnings} setLearnings={setLearnings} savedLearning={savedLearning} />
            </Box>
          </CardBody>
        </Card>
      </Flex>
    </>
  )
}

export default App
ここまでで以下の画面の動きが実装出来ます。
フォームの箇所に、onChangeを追加し、入力イベントにより入力されたデータをsetLocalLearningでlocalLearningに格納するようにしています。なお、ここでは、handleChangeTitle、handleChangeTimeとして関数を切り出す形にしました。
// /src/components/Edit.tsx

    const handleChangeTitle = (e: React.ChangeEvent<HTMLInputElement>) => {//学習内容の変更を反映
        setLocalLearning({
            ...localLearning,
            title: e.target.value
        })
    }

    const handleChangeTime = (e: React.ChangeEvent<HTMLInputElement>) => {//学習時間の変更を反映
        setLocalLearning({
            ...localLearning,
            time: Number(e.target.value)
        })
    }
また、Edit.tsxでは、localLearningと言う形でローカルステートを設けてます。これは当初、learningをそのまま使ってたんですが、混同しやすいステートの乱用の為か、うまく動かなかったため、敢えてそうしました。
// /src/components/Edit.tsx

    const [localLearning, setLocalLearning] = useState(learning)//渡されたlearningを格納する為にローカルステートを定義
加えて、ローカルステートの初期値は、App.tsxより渡されたlearningとしてますが、先に実装したローカルストレージからのデータ読み込み処理のタイムラグがあるようで、ローカルストレージに保存されたデータが反映されない事象が出たため、モーダルオープン時に、ステートを再セットする処理を加えています。
 // /src/components/Edit.tsx

            <Button variant='ghost' onClick={() => {//モーダルを開くボタン
                setLocalLearning(learning)//モーダルオープン時にlearning内容を再セット
                onOpen()
            }}><FiEdit color='black' /></Button>
4.2 編集反映機能の追加
続いて、編集画面で変更した内容を学習記録の配列であるlearningsに反映させる処理を実装します。
Edit.tsxに変更反映処理の関数、handleUpdateを追加します。
 // /src/components/Edit.tsx

     const handleUpdate = () => {
        const updatedLearnings = [...learnings]; // 配列をコピー
        updatedLearnings[index] = { ...localLearning }; // 指定されたindexの要素を更新
        setLearnings(updatedLearnings);
        onClose();
    }
ここでは、learningsの配列のコピーを作成し、App.tsxより渡されたindex(App.tsxのmap処理で用いたindex)を元に、更新されたデータをsetLearningsで格納しています。
handleUpdateを「データを更新」ボタンクリック時実行するようにします。
 // /src/components/Edit.tsx


                        <Button
                            colorScheme='blue'
                            variant='outline'
                            mr={3}
                            onClick={handleUpdate}//クリック時、handleUpdate実行
                        >
                            データを更新
                        </Button>
Edit.tsxのコード全体は下記の通りです。
// /src/components/Edit.tsx
import React, { useRef, useState } from 'react';
import { Button, FormControl, FormLabel, Input, Modal, ModalBody, ModalCloseButton, ModalContent, ModalFooter, ModalHeader, ModalOverlay, useDisclosure } from '@chakra-ui/react';
import { FiEdit } from "react-icons/fi"

type Props = {
    index: number
    learning: { title: string, time: number }
    learnings: { title: string, time: number }[]
    setLearnings: (learnings: { title: string, time: number }[]) => void
}

const Edit: React.FC<Props> = ({ learning, index, learnings, setLearnings }) => {
    const { isOpen, onOpen, onClose } = useDisclosure()//モーダルの開閉に必要となるhooks(機能)
    const initialRef = useRef(null)
    const [localLearning, setLocalLearning] = useState(learning)//渡されたlearningを格納する為にローカルステートを定義

    const handleChangeTitle = (e: React.ChangeEvent<HTMLInputElement>) => {//学習内容の変更を反映
        setLocalLearning({
            ...localLearning,
            title: e.target.value
        })
    }

    const handleChangeTime = (e: React.ChangeEvent<HTMLInputElement>) => {//学習時間の変更を反映
        setLocalLearning({
            ...localLearning,
            time: Number(e.target.value)
        })
    }

     const handleUpdate = () => {
        const updatedLearnings = [...learnings]; // 配列をコピー
        updatedLearnings[index] = { ...localLearning }; // 指定されたindexの要素を更新
        setLearnings(updatedLearnings);
        onClose();
    }

    return (
        <>
            <Button variant='ghost' onClick={() => {//モーダルを開くボタン
                setLocalLearning(learning)//モーダルオープン時にlearning内容を再セット
                onOpen()
            }}><FiEdit color='black' /></Button>

            <Modal //ここよりモーダルの内容
                initialFocusRef={initialRef}
                isOpen={isOpen}
                onClose={onClose}
            >
                <ModalOverlay />
                <ModalContent>
                    <ModalHeader>記録編集</ModalHeader>
                    <ModalCloseButton />
                    <ModalBody pb={6}>
                        <FormControl>
                            <FormLabel>学習内容</FormLabel>
                            <Input
                                ref={initialRef}
                                placeholder='学習内容'
                                name='title'
                                value={localLearning.title}
                                onChange={handleChangeTitle}
                            />
                        </FormControl>

                        <FormControl mt={4}>
                            <FormLabel>学習時間</FormLabel>
                            <Input
                                type='number'
                                placeholder='学習時間'
                                name='time'
                                value={localLearning.time}
                                onChange={handleChangeTime}
                            />
                        </FormControl>
                        <div>入力されている学習内容:{localLearning.title}</div>
                        <div>入力されている学習時間:{localLearning.time}</div>
                    </ModalBody>

                    <ModalFooter>
                        <Button
                            colorScheme='blue'
                            variant='outline'
                            mr={3}
                            onClick={handleUpdate}//クリック時、handleUpdate実行
                        >
                            データを更新
                        </Button>
                        <Button onClick={onClose}>Cancel</Button>
                    </ModalFooter>
                </ModalContent>
            </Modal>
        </>
    )
}

export default Edit;
ここまでで、以下のような動きが実現出来ます。
4.3 エラーチェック機能
続いて、エラーチェック機能を追加します。
既存データの更新処理なので、新規登録時のように入力データが空なのはあまり発生しないかも知れませんが誤操作等含め、起きうるので、データがからの場合のエラー処理を実装します。NewEntry.tsxと同様のロジックです。
下記のコードをonClick時の処理として追加します。
// /src/components/Edit.tsx

<Button
 colorScheme='blue'
 variant='outline'
 mr={3}
 onClick={() => {
     if (localLearning.title !== "" && localLearning.time > 0) { //更新データが空じゃない場合に実行
         handleUpdate()
     }
     else setError("学習内容と時間を入力してください") //更新データが空の場合はエラーメッセージ設定
 }}
>
またエラー表示の内容を追加します。
// /src/components/Edit.tsx

<div>入力されている学習内容:{localLearning.title}</div>
<div>入力されている学習時間:{localLearning.time}</div>
{error &&
    <Box color="red">{error}</Box>}{/*エラー表示*/}
Edit.tsxのコード全体は以下となります。chakra-uiのimportにBoxを追加してますのでご注意ください。
// /src/components/Edit.tsx
import React, { useRef, useState } from 'react';
import { Box, Button, FormControl, FormLabel, Input, Modal, ModalBody, ModalCloseButton, ModalContent, ModalFooter, ModalHeader, ModalOverlay, useDisclosure } from '@chakra-ui/react';
import { FiEdit } from "react-icons/fi"

type Props = {
    index: number
    learning: { title: string, time: number }
    learnings: { title: string, time: number }[]
    setLearnings: (learnings: { title: string, time: number }[]) => void
}

const Edit: React.FC<Props> = ({ learning, index, learnings, setLearnings }) => {
    const { isOpen, onOpen, onClose } = useDisclosure()
    const [error, setError] = useState("") // エラー処理追加
    const initialRef = useRef(null)
    const [localLearning, setLocalLearning] = useState(learning)

    const handleChangeTitle = (e: React.ChangeEvent<HTMLInputElement>) => {
        setLocalLearning({
            ...localLearning,
            title: e.target.value
        })
    }

    const handleChangeTime = (e: React.ChangeEvent<HTMLInputElement>) => {
        setLocalLearning({
            ...localLearning,
            time: Number(e.target.value)
        })
    }

     const handleUpdate = () => {
        const updatedLearnings = [...learnings];
        updatedLearnings[index] = { ...localLearning };
        setLearnings(updatedLearnings);
        onClose();
    }

    return (
        <>
            <Button variant='ghost' onClick={() => {
                setLocalLearning(learning)
                onOpen()
            }}><FiEdit color='black' /></Button>

            <Modal
                initialFocusRef={initialRef}
                isOpen={isOpen}
                onClose={onClose}
            >
                <ModalOverlay />
                <ModalContent>
                    <ModalHeader>記録編集</ModalHeader>
                    <ModalCloseButton />
                    <ModalBody pb={6}>
                        <FormControl>
                            <FormLabel>学習内容</FormLabel>
                            <Input
                                ref={initialRef}
                                placeholder='学習内容'
                                name='title'
                                value={localLearning.title}
                                onChange={handleChangeTitle}
                                onFocus={() => setError("")}//再フォーカスでエラーメッセージ解除
                            />
                        </FormControl>

                        <FormControl mt={4}>
                            <FormLabel>学習時間</FormLabel>
                            <Input
                                type='number'
                                placeholder='学習時間'
                                name='time'
                                value={localLearning.time}
                                onChange={handleChangeTime}
                                onFocus={() => setError("")}//再フォーカスでエラーメッセージ解除
                            />
                        </FormControl>
                        <div>入力されている学習内容:{localLearning.title}</div>
                        <div>入力されている学習時間:{localLearning.time}</div>
                        {error &&
                            <Box color="red">{error}</Box>}{/*エラー表示*/}
                    </ModalBody>

                    <ModalFooter>
                        <Button
                            colorScheme='blue'
                            variant='outline'
                            mr={3}
                            onClick={() => {
                                if (localLearning.title !== "" && localLearning.time > 0) { //更新データが空じゃない場合に実行
                                    handleUpdate()
                                }
                                else setError("学習内容と時間を入力してください") //更新データが空の場合はエラーメッセージ設定
                            }}
                        >
                            データを更新
                        </Button>
                        <Button onClick={onClose}>Cancel</Button>
                    </ModalFooter>
                </ModalContent>
            </Modal>
        </>
    )
}

export default Edit;
4.4 ローカルストレージへの保管・読込
続いて、NewEntryと同様、更新したデータをローカルストレージに格納します。
まず、App.tsxに、Edit.tsxにストレージ格納関数のsavedLearningを渡すように追記します。
// /src/App.tsx

<Edit learning={learning} index={index} learnings={learnings} setLearnings={setLearnings} savedLearning={savedLearning} />{/*/Editに渡す、savedLearning追加*/}
Edit.tsxは以下を追加します。まずは型定義と受取データ(Props)の追加です。
// /src/components/Edit.tsx

type Props = {
    index: number
    learning: { title: string, time: number }
    learnings: { title: string, time: number }[]
    setLearnings: (learnings: { title: string, time: number }[]) => void
    savedLearning: (learnings: { title: string, time: number }[]) => void//savedLearning追加
}

const Edit: React.FC<Props> = ({ learning, index, learnings, setLearnings, savedLearning }) => {//savedLearning追加
次にhandleUpdateにローカルストレージ格納機能のsavedLearningでの処理を追加します。
// /src/components/Edit.tsx

    const handleUpdate = () => {
        const updatedLearnings = [...learnings];
        updatedLearnings[index] = { ...localLearning };
        setLearnings(updatedLearnings);
        savedLearning(updatedLearnings); // ローカルストレージへの格納
        onClose();
    }
これで編集機能は完成です。
現時点のApp.tsx及びEdit.tsxのコード全体は以下の通りです。
// /src/App.tsx
import { useEffect, useState } from "react";
import { Box, Button, Card, CardBody, CardHeader, Flex, Heading, Table, TableContainer, Tbody, Td, Th, Thead, Tr } from "@chakra-ui/react"
import { MdDelete } from "react-icons/md"
import NewEntry from "./components/NewEntry";
import Edit from "./components/Edit";


function App() {
  const [learnings, setLearnings] = useState([
    { title: 'React', time: 10 },
    { title: 'TypeScript', time: 5 }
  ])

  const savedLearning = (learnings: { title: string, time: number }[]) => {
    localStorage.setItem("learnings", JSON.stringify(learnings));
  };

  useEffect(() => {
    const storedLearning = localStorage.getItem("learnings");
    if (storedLearning) {
      setLearnings(JSON.parse(storedLearning));
    }
  }, []);

  const calculateTotalTime = () => {
    return learnings.reduce((total, learning) => total + learning.time, 0);
  };

  return (
    <>
      <Flex alignItems='center' justify='center' p={5}>
        <Card size={{ base: 'sm', md: 'lg' }}>
          <CardHeader>
            <Heading size='md' textAlign='center'>Learning Records</Heading>
          </CardHeader>
          <CardBody>
            <Box textAlign='center'>
              学習記録
              <TableContainer>
                <Table variant='simple' size={{ base: 'sm', md: 'lg' }}>
                  <Thead>
                    <Tr>
                      <Th>学習内容</Th>
                      <Th>時間(分)</Th>
                      <Th></Th>
                      <Th></Th>
                    </Tr>
                  </Thead>
                  <Tbody>
                    {learnings.map((learning, index) => (
                      <Tr key={index}>
                        <Td>{learning.title}</Td>
                        <Td>{learning.time}</Td>
                        <Td>
                          <Edit learning={learning} index={index} learnings={learnings}
                          setLearnings={setLearnings} savedLearning={savedLearning} />
                          {/*/Editに渡す、savedLearning追加*/}
                        </Td>
                        <Td>
                          <Button variant='ghost'><MdDelete color='black' /></Button>
                        </Td>
                      </Tr>
                    ))}
                  </Tbody>
                </Table>
              </TableContainer>
            </Box>
            <Box p={5}>
              <div>合計学習時間:{calculateTotalTime()}分</div>
            </Box>
            <Box p={25}>
              <NewEntry learnings={learnings} setLearnings={setLearnings} savedLearning={savedLearning} />
            </Box>
          </CardBody>
        </Card>
      </Flex>
    </>
  )
}

export default App
// /src/components/Edit.tsx
import React, { useRef, useState } from 'react';
import { Box, Button, FormControl, FormLabel, Input, Modal, ModalBody, ModalCloseButton, ModalContent, ModalFooter, ModalHeader, ModalOverlay, useDisclosure } from '@chakra-ui/react';
import { FiEdit } from "react-icons/fi"
type Props = {
index: number
learning: { title: string, time: number }
learnings: { title: string, time: number }[]
setLearnings: (learnings: { title: string, time: number }[]) => void
savedLearning: (learnings: { title: string, time: number }[]) => void//savedLearning追加
}
const Edit: React.FC<Props> = ({ learning, index, learnings, setLearnings, savedLearning }) => {//savedLearning追加
const { isOpen, onOpen, onClose } = useDisclosure()
const [error, setError] = useState("")
const initialRef = useRef(null)
const [localLearning, setLocalLearning] = useState(learning)
const handleChangeTitle = (e: React.ChangeEvent<HTMLInputElement>) => {
setLocalLearning({
...localLearning,
title: e.target.value
})
}
const handleChangeTime = (e: React.ChangeEvent<HTMLInputElement>) => {
setLocalLearning({
...localLearning,
time: Number(e.target.value)
})
}
const handleUpdate = () => {
const updatedLearnings = [...learnings];
updatedLearnings[index] = { ...localLearning };
setLearnings(updatedLearnings);
savedLearning(updatedLearnings); // ローカルストレージへの格納
onClose();
}
return (
<>
<Button variant='ghost' onClick={() => {
setLocalLearning(learning)
onOpen()
}}><FiEdit color='black' /></Button>
<Modal
initialFocusRef={initialRef}
isOpen={isOpen}
onClose={onClose}
>
<ModalOverlay />
<ModalContent>
<ModalHeader>記録編集</ModalHeader>
<ModalCloseButton />
<ModalBody pb={6}>
<FormControl>
<FormLabel>学習内容</FormLabel>
<Input
ref={initialRef}
placeholder='学習内容'
name='title'
value={localLearning.title}
onChange={handleChangeTitle}
onFocus={() => setError("")}
/>
</FormControl>
<FormControl mt={4}>
<FormLabel>学習時間</FormLabel>
<Input
type='number'
placeholder='学習時間'
name='time'
value={localLearning.time}
onChange={handleChangeTime}
onFocus={() => setError("")}
/>
</FormControl>
<div>入力されている学習内容:{localLearning.title}</div>
<div>入力されている学習時間:{localLearning.time}</div>
{error &&
<Box color="red">{error}</Box>}
</ModalBody>
<ModalFooter>
<Button
colorScheme='blue'
variant='outline'
mr={3}
onClick={() => {
if (localLearning.title !== "" && localLearning.time > 0) {
handleUpdate()
}
else setError("学習内容と時間を入力してください")
}}
>
データを更新
</Button>
<Button onClick={onClose}>Cancel</Button>
</ModalFooter>
</ModalContent>
</Modal>
</>
)
}
export default Edit;5. 削除機能の追加
続いて、削除機能を作成していきます。現状は、App.tsx上に削除用(ゴミ箱)アイコンのボタンが表示されているだけですが、これをクリックすると、削除確認のモーダルが表示され、削除処理が出来るようにします。これまでと同様、Chakra UIのModalコンポーネントを使っていきます。
5.1 削除画面の作成
削除用コンポーネントを新たに作成します。componentsフォルダ配下に、Delete.tsxを作成してください。
Delete.tsxに以下のコードを記載します。
// /src/components/Delete.tsx
import React, { useRef } from 'react';
import { Box, Button, Modal, ModalBody, ModalCloseButton, ModalContent, ModalFooter, ModalHeader, ModalOverlay, useDisclosure } from '@chakra-ui/react';
import { MdDelete } from 'react-icons/md';


type Props = {
    index: number
    learning: { title: string, time: number }
    learnings: { title: string, time: number }[]
    setLearnings: (learnings: { title: string, time: number }[]) => void
    savedLearning: (learnings: { title: string, time: number }[]) => void//savedLearning追加
}

const Delete: React.FC<Props> = ({ learning }) => {
    const { isOpen, onOpen, onClose } = useDisclosure()//モーダルの開閉に必要となるhooks(機能)
    const initialRef = useRef(null)

    return (
        <>
            <Button variant='ghost'
                onClick={onOpen} //モーダルを開くボタン
            >
                <MdDelete color='black' /></Button>

            <Modal //ここよりモーダルの内容
                isOpen={isOpen}
                onClose={onClose}
            >
                <ModalOverlay />
                <ModalContent>
                    <ModalHeader>データ削除</ModalHeader>
                    <ModalCloseButton />
                    <ModalBody pb={6}>
                        <Box>
                            以下のデータを削除します。<br />
                            学習内容:{learning.title}、学習時間:{learning.time}
                        </Box>
                    </ModalBody>
                    <ModalFooter>
                        <Button
                            ref={initialRef}
                            colorScheme='red'
                            variant='outline'
                            mr={3}
                        >
                            削除
                        </Button>
                        <Button onClick={onClose}>Cancel</Button>
                    </ModalFooter>
                </ModalContent>
            </Modal>
        </>
    )
}

export default Delete;
App.tsxを以下のように変更します。
// /src/App.tsx
import { useEffect, useState } from "react";
import { Box, Card, CardBody, CardHeader, Flex, Heading, Table, TableContainer, Tbody, Td, Th, Thead, Tr } from "@chakra-ui/react"//Buttonのインポート削除
//MdDeleteアイコンの読み込み削除
import NewEntry from "./components/NewEntry";
import Edit from "./components/Edit";
import Delete from "./components/Delete";


function App() {
  const [learnings, setLearnings] = useState([
    { title: 'React', time: 10 },
    { title: 'TypeScript', time: 5 }
  ])

  const savedLearning = (learnings: { title: string, time: number }[]) => {
    localStorage.setItem("learnings", JSON.stringify(learnings));
  };

  useEffect(() => {
    const storedLearning = localStorage.getItem("learnings");
    if (storedLearning) {
      setLearnings(JSON.parse(storedLearning));
    }
  }, []);

  const calculateTotalTime = () => {
    return learnings.reduce((total, learning) => total + learning.time, 0);
  };

  return (
    <>
      <Flex alignItems='center' justify='center' p={5}>
        <Card size={{ base: 'sm', md: 'lg' }}>
          <CardHeader>
            <Heading size='md' textAlign='center'>Learning Records</Heading>
          </CardHeader>
          <CardBody>
            <Box textAlign='center'>
              学習記録
              <TableContainer>
                <Table variant='simple' size={{ base: 'sm', md: 'lg' }}>
                  <Thead>
                    <Tr>
                      <Th>学習内容</Th>
                      <Th>時間(分)</Th>
                      <Th></Th>
                      <Th></Th>
                    </Tr>
                  </Thead>
                  <Tbody>
                    {learnings.map((learning, index) => (
                      <Tr key={index}>
                        <Td>{learning.title}</Td>
                        <Td>{learning.time}</Td>
                        <Td>
                          <Edit learning={learning} learnings={learnings}
                          setLearnings={setLearnings} savedLearning={savedLearning} />
                        </Td>
                        <Td>
                          <Delete learning={learning} index={index} learnings={learnings}
                          setLearnings={setLearnings} savedLearning={savedLearning} />{/*/Deleteに渡す*/}
                        </Td>
                      </Tr>
                    ))}
                  </Tbody>
                </Table>
              </TableContainer>
            </Box>
            <Box p={5}>
              <div>合計学習時間:{calculateTotalTime()}分</div>
            </Box>
            <Box p={25}>
              <NewEntry learnings={learnings} setLearnings={setLearnings} savedLearning={savedLearning} />
            </Box>
          </CardBody>
        </Card>
      </Flex>
    </>
  )
}

export default App
この時点で以下のようにゴミ箱アイコンをクリックすると、削除用のモダールが表示されます。

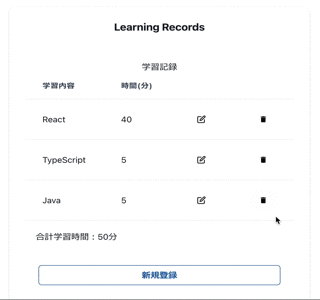
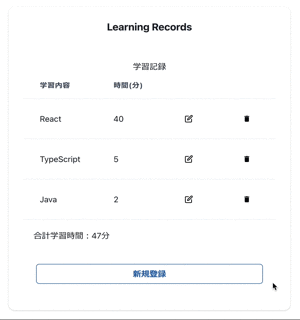
5.2 削除機能の実装
続いて、モーダルの「削除」ボタンをクリックすると、実際に該当の学習データを削除する処理を追加します。Delete.tsxに削除処理の関数、handleDeleteを追加します。
// /src/components/Delete.tsx

    const handleDelete = () => {
        setLearnings(learnings.filter((_, i) => i !== index));//削除対象以外のデータを格納
        savedLearning(learnings.filter((_, i) => i !== index));//ローカルストレージへの格納
        onClose();
    }
削除対象となるのは、indexで渡された番号のデータです。それを、ここでは、filter関数で、i !== index、indexでは無いデータをフィルタする処理をしています。つまり、削除対象外のデータを抽出してsetLearningsで格納し直しています。これにより、削除対象のデータを排除しています。
また、ローカルストレージ格納を行う、savedLearningの処理も加えています。
そして、これをボタンクリック時の処理として組み込みます。
// /src/components/Delete.tsx

<Button
    ref={initialRef}
    colorScheme='red'
    variant='outline'
    mr={3}
    onClick={handleDelete}//クリック時、handleDeleteを実行
>
これで以下の画面のように削除処理が実行できます。
ここまでで、App.tsx、Delete.tsxのコード内容は以下となっています。
// /src/App.tsx
import { useEffect, useState } from "react";
import { Box, Card, CardBody, CardHeader, Flex, Heading, Table, TableContainer, Tbody, Td, Th, Thead, Tr } from "@chakra-ui/react"//Buttonのインポート削除
//MdDeleteアイコンの読み込み削除
import NewEntry from "./components/NewEntry";
import Edit from "./components/Edit";
import Delete from "./components/Delete";


function App() {
  const [learnings, setLearnings] = useState([
    { title: 'React', time: 10 },
    { title: 'TypeScript', time: 5 }
  ])

  const savedLearning = (learnings: { title: string, time: number }[]) => {
    localStorage.setItem("learnings", JSON.stringify(learnings));
  };

  useEffect(() => {
    const storedLearning = localStorage.getItem("learnings");
    if (storedLearning) {
      setLearnings(JSON.parse(storedLearning));
    }
  }, []);

  const calculateTotalTime = () => {
    return learnings.reduce((total, learning) => total + learning.time, 0);
  };

  return (
    <>
      <Flex alignItems='center' justify='center' p={5}>
        <Card size={{ base: 'sm', md: 'lg' }}>
          <CardHeader>
            <Heading size='md' textAlign='center'>Learning Records</Heading>
          </CardHeader>
          <CardBody>
            <Box textAlign='center'>
              学習記録
              <TableContainer>
                <Table variant='simple' size={{ base: 'sm', md: 'lg' }}>
                  <Thead>
                    <Tr>
                      <Th>学習内容</Th>
                      <Th>時間(分)</Th>
                      <Th></Th>
                      <Th></Th>
                    </Tr>
                  </Thead>
                  <Tbody>
                    {learnings.map((learning, index) => (
                      <Tr key={index}>
                        <Td>{learning.title}</Td>
                        <Td>{learning.time}</Td>
                        <Td>
                          <Edit learning={learning} index={index} learnings={learnings}
                          setLearnings={setLearnings} savedLearning={savedLearning} />
                        </Td>
                        <Td>
                          <Delete learning={learning} index={index} learnings={learnings}
                          setLearnings={setLearnings} savedLearning={savedLearning} />{/*/Deleteに渡す*/}
                        </Td>
                      </Tr>
                    ))}
                  </Tbody>
                </Table>
              </TableContainer>
            </Box>
            <Box p={5}>
              <div>合計学習時間:{calculateTotalTime()}分</div>
            </Box>
            <Box p={25}>
              <NewEntry learnings={learnings} setLearnings={setLearnings} savedLearning={savedLearning} />
            </Box>
          </CardBody>
        </Card>
      </Flex>
    </>
  )
}

export default App
// /src/components/Delete.tsx
import React, { useRef } from 'react';
import { Box, Button, Modal, ModalBody, ModalCloseButton, ModalContent, ModalFooter, ModalHeader, ModalOverlay, useDisclosure } from '@chakra-ui/react';
import { MdDelete } from 'react-icons/md';


type Props = {
    index: number
    learning: { title: string, time: number }
    learnings: { title: string, time: number }[]
    setLearnings: (learnings: { title: string, time: number }[]) => void
    savedLearning: (learnings: { title: string, time: number }[]) => void//savedLearning追加
}

const Delete: React.FC<Props> = ({ learning, index, learnings, setLearnings, savedLearning }) => {
    const { isOpen, onOpen, onClose } = useDisclosure()//モーダルの開閉に必要となるhooks(機能)
    const initialRef = useRef(null)

    const handleDelete = () => {
        setLearnings(learnings.filter((_, i) => i !== index));//削除対象以外のデータを格納
        savedLearning(learnings.filter((_, i) => i !== index));//ローカルストレージへの格納
        onClose();
    }

    return (
        <>
            <Button variant='ghost'
                onClick={onOpen} //モーダルを開くボタン
            >
                <MdDelete color='black' /></Button>

            <Modal //ここよりモーダルの内容
                isOpen={isOpen}
                onClose={onClose}
            >
                <ModalOverlay />
                <ModalContent>
                    <ModalHeader>データ削除</ModalHeader>
                    <ModalCloseButton />
                    <ModalBody pb={6}>
                        <Box>
                            以下のデータを削除します。<br />
                            学習内容:{learning.title}、学習時間:{learning.time}
                        </Box>
                    </ModalBody>
                    <ModalFooter>
                        <Button
                            ref={initialRef}
                            colorScheme='red'
                            variant='outline'
                            mr={3}
                            onClick={handleDelete}//クリック時、handleDeleteを実行
                        >
                            削除
                        </Button>
                        <Button onClick={onClose}>Cancel</Button>
                    </ModalFooter>
                </ModalContent>
            </Modal>
        </>
    )
}

export default Delete;
これで学習記録アプリは一通り完成です。
6. GitHub、Firebase連携
一通り、コード作成が完了しましたので、リポジトリ作成とGitHubへのアップロード(push)、そしてFirebaseとGitHub連携を行い、GitHubプッシュ時にFirebaseに自動デプロイされるようにします。
この一連の作業は、過去投稿した下記記事に詳細を記載してますので、ご参照ください。プロジェクト名等を読み替えていただくだけです。
(本当は、ここにも記載しようと思いましたが、記事内容が長くなったせいか、記事保存時の挙動が怪しくなってきたので、割愛させてください。。。)

Firebaseでデプロイして、ドメインの箇所からリリースされたアプリケーションを確認してみましょう。以下画面のようにアプリが表示されれば公開完了です!
学習記録アプリ、これで完了です。今回はデータの保管にローカルストレージを利用しましたが、次回は、Supabaseを利用したケースを紹介したいと思います。
7. ステート、ロジックの整理集約
今回の記事では、扱うstateやロジックは、割と各コンポーネントに持たせる形にしてますが(一部はApp.tsxから渡してますが)、Reactの設計思想は、コンポーネントのロジック・機能と、画面レンダリング分離の考えがあります。stateや機能・ロジックを実現する関数はApp.tsx等のトップコンポーネントに集約し、他のコンポーネントは、App.tsxから関数を含めたデータ、ステートを渡され(Propsと呼ばれます)画面レンダリングを主に処理する考え方です。
また、扱うコンポーネントや多層構造のコンポーネントが多くなる場合(コンポーネントから更に別のコンポーネントを呼び出すなど)は、App.tsxから渡すPropsの管理が煩雑になるため、それを集約処理するためのuseContextという仕組みもあります。
そうした観点からコードを整理することもしてみるといいかと思います。


One response
[…] 前回に続き、学習記録アプリのチュートリアルの2回目です。今回は、学習記録データの格納に、BaaS(Backend as a Service)であるSupabaseを利用してみます。コードは前回の記事をベースに変 […]